
A window box can add enormous curb appeal to a house and provide a garden opportunity for even city dwellers. And, they are easy to make. Just follow this simple summer DIY tutorial to deck your sills with beautiful summer blooms this weekend.
Beauty sprouts outside your very window when you make and install these window boxes. Blooming with colorful annual flowers, perennials, or lush succulents, window boxes are those extra touches you’ve long desired to grace your home’s exterior. Enjoy your boxes from inside, too, as the tops of gorgeous flowers and plants peek up just below the window frame.
The ultimate do-it-yourself project, window boxes are easy to make and require only the most basic tools to construct. Materials can be sourced from your local home improvement store, many even available in pre-cut sizes. If not, you’ll find that most stores will cut the materials for you on-site, saving valuable time.
Why I Love These Window Boxes
Window boxes are a great way to add color to a home no matter what the season. The look can be changed out four times a year, for each season. From early spring and summer annuals, fresh herbs to hardy plants, gourds and pumpkins, there are many ways to change the look with the seasons.
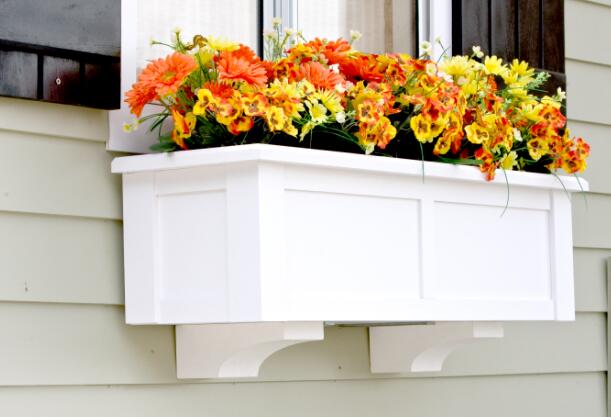
Window boxes are an easy way to dress up the exterior of your home or shed and add beauty, character and charm.
The plastic liners are removable. In our area, we experience warm days and cold nights during the early Spring season. The plastic liners, filled with flowers, can be lifted out and put inside the garden shed in the evening, This is the best way to get an early start on planting flowers, yet the frost will not kill the flowers when overnight temperatures get below freezing.
These DIY simple window planters are long lasting and will not fall apart since they have no wooden bottom board. Water does not sit in the bottom of the box, but instead drains straight out since there is no bottom in the box.
Window Box Ideas for Your Home
1. Lattice Window Box

Many DIY window box designs depend on wood strips for their finishing touch. This delightful version from Pretty Handy Girl Brittany goes all the way with character by adding a grid of lattice across the front and sides. It’s super durable, too, twice-over as the box is made with naturally weather-resistant cedar, plus the lattice is 1 1/2 inch wide weather-defying PVC (plastic).
2. Farmhouse-Style Design

What better way to complement farmhouse-style board and batten shutters than with a matching window box? Traci from the home blog Beneath My Heart placed thin 2-inch wide poplar trim atop the also poplar board window box. This simple but effective touch gives the box a classic rail-and-stile look, similar to that of a Craftsman-style door.
3. Large Window Box

Chelsea of the lifestyle blog Two Twenty-One, along with husband Brad, swiftly pulled together this clean sparse window box out of 3/4-inch pine purchased from Lowe’s. They had a store associate cut three boards to 80 inches long by 7 1/4 inches wide. To eliminate yet another step, they even had the store cut two end caps at 7 1/4 inches by 7 1/4 inches.
Painted and mounted on metal brackets to the home’s brick exterior, these window boxes perfectly accent the white windows and casing. Best of all, these low-key boxes stand back and let the true stars of the show shine, that container garden favorite: brightly colored perennial calibrachoas.
4. Wood Pallet Design

It was the perfect opportunity—when you want to DIY a window box for your house, and you just happen to notice a wooden pallet nearby, serendipity has spoken. From that wood pallet, the Deckers put together a 32-inch wide window box two boards high with a gap between the boards for drainage. To keep the soil in, they lined the box with a black window screen mesh. When the window box is filled with black potting soil, the mesh visually disappears.
5. Cedar Fence Window Box

This petite and utterly adorable DIY window box is made from just one fence panel. That’s right: the always-inventive Whitney at the blog Shanty 2 Chic used just a single cedar fence board to make this box. First, she began with a 24-inch plastic window box liner, then fashioned the box around that. Trim around the top and bottom of the box were added for artistic finishing touches.
6. Design With Corbels
Capable of holding up to 160 pounds of plants and soil, this classic style DIY window box gains its strength from two hefty corbels, as well as the five thick lag bolts that attach the box to the house.
7. Dog-Eared Cedar Fence Style

Raise the charm level to “high” by adding fence tops to your window box. This fence style with the corners lopped off is called dog-eared. Blogger Sara from The Aqua House cut off fence tops from standard 6-foot cedar fence boards, each piece 5 5/8 inches by 5 1/2 inches. Then she applied them to her 60-inch window box for a winsome, homey look.
8. Fancy Trimmed Box

There is no easier way to fancy up your DIY window box than by adding fun trim. Make the molding and trim section of your local home center your oyster, and let your creativity run free. Jen of the blog iHeart Organizing started with inexpensive whitewood common boards (8 inches wide by 8 feet long). Then she gave the box a lovely, decorative touch merely by adding a strip of pine primed finger-jointed base cap molding across the top. A bead of glue and a few brad nails were all that were needed to attach the trim.
9. Chevron Pattern Style
![]()
A soothing mixture of pastels graces this chevron patterned DIY window box. It began as a lifeless white box before its owner added painted wood strips to the front, giving it a colorful second life.
electric drill
drill bits
hammer
tape measure
clamps
2-1/2″ sash brush
3/4″ cypress or cedar boards
2-3/4″ concrete screws
wood filler
1 quart primer
pressure treated 2x4s
1-1/4″ exterior wood screws
1-1/4″ rustproof nails
medium-grit sandpaper
1 quart exterior paint (oil or latex, but same as primer)
How to Build a Window Box
Window boxes add charm and a splash of color to a home’s exterior. This project is ideal for a novice DIYer and can be completed in a day.
Step 1: Cut List
Cut 3/4″-thick cypress or cedar boards to following dimensions:
(3) 8″ wide x window length
(2) 1-1/4″ wide x window length
(3) 1-1/4″ wide x 5-3/4″ long
(2) 8″ wide x 11″ long
Cut 2″ x 4″ pressure-treated lumber into three (3) 8″-long pieces.
Step 2: Secure the Cleats
When it’s full of plants and soil, a window box can be very heavy. The best way to mount it is to properly secure it to the exterior wall using cleats. To create cleats, cut three 8″ pieces of pressure-treated 2×4. Hold the 2×4 tightly against the exterior wall and drill two pilot holes where you’d like screws (Image 2). Drive two 3/4″ concrete screws through pilot holes to secure cleat to wall (Image 3). Repeat process on other cleats.
Step 3: Assemble Front and Back
Place bottom of window box flat on work surface. Stand front of box on end and press tightly against side of box bottom. Clamp or hold in place, then drill pilot holes every eight inches using 1/8″ drill bit (Image 1). Insert 1-1/4″ screws into pilot holes (Image 2). Remove clamps (if used) and repeat on back side of box.
Step 4: Assemble Sides
When measuring dimensions of side panels, allow an extra 1-1/2″ overhang on back side to cover up exposed cleat on house. Attach sides to planter using 1-1/4″ wood screws.
Step 5: Attach Trim
Cut two 1-1/4″-wide trim pieces to exact length of front panel of window box. Make sure that each trim piece is flush with top and bottom of front panel, then tap into place with nails. Position three 1-1/4″-wide x 5-2/4″-long pieces on left and right side of box and one centered. Tack into place with nails.
Step 6: Prime and Paint
Using a sash brush, apply primer to window box. If using a dark color like red or black, start with a tinted primer coat for better coverage. Allow primer to dry, then apply one to two coats of exterior semi-gloss paint.
Pro Tip: For a smooth finish on the window box, fill nail and screw holes with wood filler before painting. Allow to dry, then sand entire box with medium-grit sandpaper. As this is an exterior project, this finishing step is optional.
Step 7: Hang the Window Box
Holding window box in place against cleats, drive four screws through back panel into each 2″ x 4″ block.
Step 8: Create Drainage
Using a 3/8″ drill bit, drill holes straight through bottom panel to allow for drainage. Drill one hole roughly every six square inches.
Step 9: Fill Window Box
Add a 1″ to 2″ layer of gravel in the bottom of window box, to allow excess water to drain. Cover gravel with potting soil, filling box to about an inch from top. Add plants and thoroughly water.
Necessary tools:

Finish and Install
1. Apply an exterior primer and two coats of exterior paint to the planter box. The planter boxes can be attached to wall studs, the structural sheathing that makes up the outside of your home, or to brick.
2. Mark two 3/8-inch holes under your window. Apply silicone caulk in and around the hole, and thread the screw hooks into the wall. The silicone will help prevent water infiltration into your home.
3. When the paint dries on the planter box, drill two 1/4-inch-diameter holes 2 inches from the top edge of the back — spaced the same distance apart as the screw hooks. Install two eye bolts in the back of the box using a washer and a nut on each face. Trim the remaining thread that extends into the box using a hacksaw.
4. Hang the planters under the window and add potted flowers or herbs of your choice.
Helpful Tips
You can attach the window box using several different methods. One option is to drill holes into the siding or brick and use heavy-duty deck screws to attach the box directly to the area directly under the windowsill. Or you can use window box brackets or try a cleatless system, which eases water damage issues.
To fasten the box to a brick or concrete-block wall, use 2-inch lag screws with lead masonry anchors. Wearing safety goggles, drill holes for the anchors with a power drill and a carbide-tipped masonry bit; insert the anchors and then drive the screws in flush with the wall surface.